Have you ever heard the term ‘C&C cage’, but you don’t know what it is?
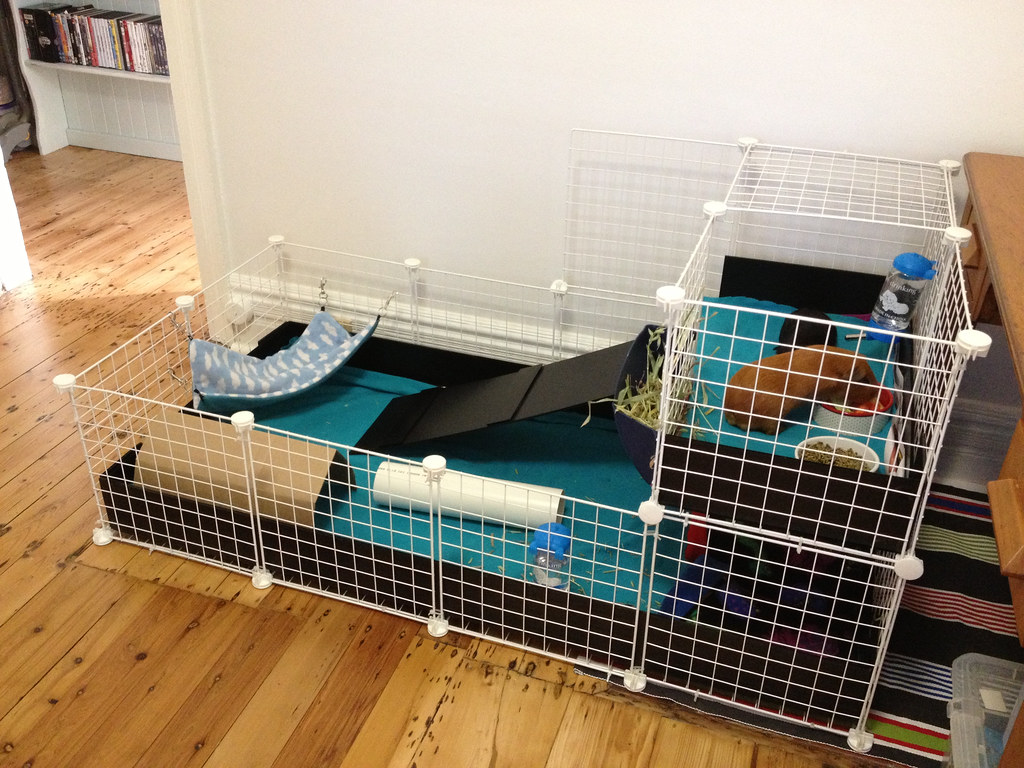
The term ‘C&C’ stands for Cubes and Coroplast. The ‘cubes’ are actually wire storage grids, which are connected together to make the walls of a C&C cage. Coroplast is a brand name for ‘corrugated plastic’ which is often used as the base of a C&C cage.
Featured image is licensed under a Creative Commons Attribution 2.0 license https://creativecommons.org/licenses/by/2.0/. Source:https://www.flickr.com/photos/philliecasablanca/9432551172
Let’s first learn about the pros and cons of a C&C cage!
Pros
- Large.
- Cheap for the amount of space they provide.
- It provides you with easy access to your pets.
- Customizable (that is, if you build the cage yourself). You can customize the size and shape, height of the base and sometimes even the color of the grids and base, etc, to make the best cage for you and your piggies.
- Easy to make compared to other DIY cages.
Cons
- Other animals can get in the cage if they are allowed in the same room.
- They are not as sturdy as some other cages
Where to Buy C&C Cages
If you don’t want to make a C&C cage yourself, you can also purchase them at online stores, such as Guinea Pig Cages Store, Piggy Bedspreads, and Etsy!

How to Make C&C Cages
To make a c&c cage, you will need:
- Coroplast
- Grid Cubes (make sure there are at least 9 holes in each grid, otherwise, the guinea pigs may be able to get their heads stuck in the holes)
- Zip Ties (you may need more than you think)
- Scissors or another cutting tool
- A marker
- Ruler or measuring tape
- Duct tape (optional)
Before you make your C&C cage, you should take some time to plan out your cage design.
How big do you want it? (Ensure that it is big enough for the number of guinea pigs you have). Will it fit in the space you want it to be in? (Make sure to double-check using a ruler or measuring tape).
What shape do you want it to be? Rectangle? L-shape? Square, etc? Will it be a multi-level cage?
How tall do you want the coroplast base to be? (The coroplast base shouldn’t be taller than 10 inches (or about 25 cm) all the way around to ensure the piggies get a good amount of ventilation)
Okay, now let’s assemble the cage!
First, make the frame of the cage (only make the first level, as of right now). To assemble the frame, take two grids, and tightly zip tie them together, so that the cage is very sturdy, and repeat for all the grids until it is done.
Now lay out your sheet of coroplast, (if you have several smaller sheets of coroplast, duct tape them together) and line up the sides of the cage with the lines on the coroplast.
After doing this, use a marker (and possibly a ruler to make the lines straight) to mark the sides about a half an inch inside of the cage frame.
Next, move the cage to the side, and cut the coroplast (all the way through) around the area that you just marked, so that it is the length around the marks is the height you want the base to be. (Remember, the height of the base shouldn’t be higher than 10 inches all the way around).
Once that’s done, cut on the marked parts of the coroplast, but don’t cut all the way through it, only cut into it enough that it will fold into the shape of a base.
Now cut (all the way through) a straight (not diagonal) line from each marked corner to the end of the coroplast, and then cut (partway through the coroplast) another straight (not diagonal) line from the corner to the end of the coroplast.
After that, flip the coroplast over, so that the marked areas are on the bottom.
Now take one side of it and fold it so that it is like the side of a base, then fold up the other side right next to it, and take the part of the coroplast that sticks out and put it behind the other side, and tape it there. Now repeat this step until it looks like a cage base.
After the base is done, put it inside the cage frame. Next, cut small holes in the base and zip tie it firmly to the grids.
How to Make a Lid for a C&C Cage
To make a lid, you will need:
Lay out a row of grids as long as the cage (e.g. if you have a 2 by 4 C&C cage, the row of grids should be 4 grids long). Now, secure the grids together on the top and bottom of each grid with zipties. Repeat this until all of the grids are connected.
Repeat until there are as many of these rows of connected grids as the cage is wide (e.g. if you have a 2 by 4 C&C cage, you should make 2 rows of connected grids). Overlap each row of grids by 4 squares.
At the corners where the grids overlap, use two zipties to secure two grids together (repeat at all of the corners where the grids overlap). When you are securing the center corners be sure to form a cross with the two zipties since this will add support.
This is the first half of the lid.
Now use grids and connectors to cover half (lengthwise) of the top of the cage. If your C&C cage is an odd number of grids wide, cover a little more than half the top of the cage with grids, for example, if you have a 3 by 4 C&C cage, cover the top of it with an area of 2 by 4 grids.
Next, add connectors on the other side of the grids that are on top of the cage and zip tie the top and bottom of each grid together.
This is the second half of the lid.
After that, put the first half of the lid on top of the second half of the lid, overlapping the first half over at least 4 squares. Next, ziptie the two sides where both halves of lid join the cage.
At the edges where the two halves of the lid overlap each other, ziptie them together with about 3 zipties per grid to secure it.
Now, use spring clip hooks to secure the sides and front of the other half of the cage.
Alternatives for Coroplast
Sometimes coroplast can be hard to find. So, if you can’t find coroplast in your area, here are some alternatives for it:
- Linoleum
- Shower Curtains
- Waterproof drop cloths
- Thick plastic tablecloths
- Waterproof mattress liners
- Tarps
Linoleum
Linoleum is a great alternative for coroplast, since it is cheaper and easier to find. However, you will have to make sure that your piggies don’t chew on it!
Shower Curtains
Shower curtains are very, very easy to find, (I mean, you may even find one lying around your house) and they also work as a substitute for coroplast! So, you can easily grab an old shower curtain, wash it, and use it for the base of your cage!
Keep in mind that if there will be grids right under the base (like for a second level) you should put something hard between the grids and the shower curtain, so the piggies won’t hurt their feet!
Waterproof Drop Cloths
Waterproof drop cloths can be found at most home improvement stores, and they work well for the base of a C&C cage. Just remember to get the waterproof ones, not the paper ones, as these will get messy and expensive.
Also remember that if there will be grids right under the base you’ll need to put something hard between the grids and the tablecloths, so the piggies won’t get their feet hurt!
Thick Plastic Tablecloths
Very similar to shower curtains: Easy to find, cheap, and you can wash an old one you already have and use it.
Make sure to get a plastic one though, so it is waterproof.
Keep in mind that if there will be grids right under the base (like for a second level) you will need to put something hard between the grids and the base, so the piggies won’t hurt their feet!
Waterproof Mattress Liners
Waterproof Mattress liners are easy to find, as they are at pretty much every home store, and work well as a coroplast substitute!
Also, remember that if there will be grids right under the base you’ll need to put something hard between the grids and the base, so the piggies won’t get their feet hurt!
Tarps
Tarps are another great option! They are very large, strong, waterproof and easy to find! You can find great, decently priced tarps, which work well for a guinea pig cage!
Remember that if there will be grids right under the base (like for a second level) you will need to put something hard between the grids and the tarp, so the piggies won’t hurt their feet!
I hope that this article has helped you!